Oct 30

SPOOKY GOBBLEDYGOOK BARS

Language that is meaningless or is made unintelligible by excessive use of abstruse technical terms; nonsense.
Synonyms: gibberish · claptrap · nonsense · rubbish · balderdash · blather · garbage · mumbo jumbo · drivel · tripe · hogwash · baloney · bilge · bull · bunk · guff · eyewash · piffle · twaddle · poppycock · phooey · hooey

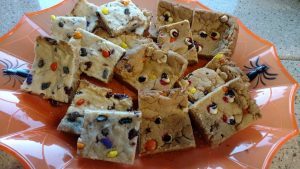
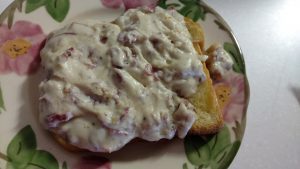
In other words, just a mish-mash of nonsensical things. Yep that would be GOBBLEDYGOOK BARS for sure.

Mom would make these bars when she had a little bit of this and a little bit of that in the cupboard. She’d make a cookie dough and throw in whatever went good with whatever cookie base she made, press it into a baking dish and bake! These basically are a monster cookie in bar form.

There are times when you need a school snack, bake sale items, holiday trays or just because and these are perfect. I don’t always have the time to make cookies and these cookie bars are so easy it’s sinful. They look like you spent a lot of time on them but they take just minutes to whip up.

You can of course make the cookie dough and if you do, make a double or triple batch and freeze some for another day. Make any kind of base cookie that your family likes. My brother; Mike, was a peanut butter fan loaded with peanut butter chips and chocolate. I liked sugar cookie or an almond cookie with cranberries and white chips or toffee and chocolate chips.
Add any kind of ingredients you want, nuts, chips, toffee, candy canes or coconut, just remember to not go overboard. You don’t want to end up with more “fixins” than cookie. You also don’t want it to get to sweet, so be careful.

Once you take them out of the oven; while they are still warm, add any candy decorations you want. I made googly eyes on the peanut butter ones and my little taste tester said the eyes needed to be bloody because it was Halloween, so a tube of red decorating gel later, we had bloody eyes!

You can bake these up while the kids are out Trick or Treating and have a warm batch of bar cookies to go with a rich and creamy hot chocolate to get rid of the fall chill.

I like to use a package mix because there are only 2 of us and I can make the sugar cookie with craisins and white chips for my self and Bob likes peanut butter with Reese’s Pieces and chopped nuts.

GOBBLEDYGOOK BARS:

Cookie dough recipe if making from scratch
or
Package cookie mix if desired, following package mixing directions
Fixings of your choice:
Chocolate Chips
White Chips
Nuts
Coconut
Dried Fruit
Preheat Oven to 350.
Spray a baking dish with cooking spray with flour in it, or flour your pan.
Mix cookie dough as directed and add in fixings.
Spread in baking dish and bake 16-18 minutes, turning halfway through.
Remove from oven and immediately place any candy decorations you may want, pressing them in slightly.
Let cool completely before removing from pan.

Go Ahead… “Just Try It!”

Oct 25

BEEF BARLEY STEW

Whether you put this in the oven, the crockpot or on the stove; nothing is like the warm, comforting taste of BEEF BARLEY STEW. Just brown off your beef and toss everything in the vessel of choice and forget about it.

The rich, brown gravy with the tender meat, vegetables and barley will make a party in your mouth! This is one of those dishes that you can add any kind of vegetables you have in your fridge or freezer that your family likes, it’s a great way to incorporate Brussel sprouts, kids won’t know they are eating them with all that luscious gravy they will be swimming in.

Enough talking, gather your ingredients and let’s get this party started!!

BEEF BARLEY STEW:

3 Tbl vegetable oil

1 1/2 – 2 lbs beef chuck roast, cut into 1″ cubes

1 medium onion, roughly chopped

1/4 – 1/3 cup flour

3- ribs celery, cut into 3/4″ pieces

2-3 carrots, cut into 3/4″ chunks

1 1/2 tsp kosher salt

1 tsp fresh ground black pepper

2 tsp Accent

1 Tbl Kitchen Bouquet

6 cups water, more if needed

1 – 1 1/2 cups barley ( medium or quick cooking )

Heat oil in a large dutch oven. Season meat with salt, pepper and Accent and brown on all sides. Add onions and cook, stirring occasionally until translucent. Sprinkle flour over the meat and onion mixture and cook 2-3 minutes, stirring often.

Add the water, celery, carrots, barley and kitchen bouquet. Cover and simmer 45 minutes or until barley is cooked and meat and vegetables are tender. If using the oven, bake 1 1/2 – 2 hours until all is tender.

If using the crock pot, 4-5 hours on high or 7-8 hours on low.

Add more water if needed if the stew is too thick. Barley will absorb a lot of water.

Go Ahead… “Just Try It!”

Oct 21

SUPER MOIST MEATLOAF

Meatloaf is one of those all purpose meals, you have it for dinner, the leftovers are great as a sandwich and if you are in my house, my husband likes it with a couple of fried eggs on it for a breakfast sandwich.

This meatloaf is so easy to make and takes literally no time to throw together when you get home from work late or double the recipe if  you suddenly find yourself with extra people for dinner. Pair it with mashed potato patties and dinner is ready is good to go.

SUPER MOIST MEATLOAF:

1 1/2 lbs ground beef

1 small onion, finely chopped

2 eggs

1/3 cup bread/cracker crumbs

1 tsp kosher salt

1 tsp fresh ground black pepper

1 tsp Accent

1 bottle chili sauce, divided

Preheat oven to 350.

In a medium bowl, combine ground beef, chopped onion, eggs, cracker/bread crumb, salt, pepper, accent and 1/4 cup of the chili sauce.

Gently mix until combined but do not over mix as meatloaf will toughen.

Place in a loaf pan or baking dish and spread approximately 1/4 cup of chili sauce on top.  Bake 35-45 minutes, basting with additional chili sauce as needed or desired, removing any liquid with a baster, that gathers in the bottom of the pan so that the meat doesn’t ” boil ”

When done, let rest 10 minutes before serving.

Serve with mashed potato patties or baked potato and a crisp green salad.

Go Ahead… ”Just Try It! ”

Oct 06

SUPER EASY LASAGNA

All kids love LASAGNA, OK, adults do as well. But when you think of making it, you picture  the time it takes to prep that you just don’t have so you buy the frozen stuff and pass it off as dinner.

I can honestly tell you that lasagna can be put together in 15 minutes and on the table in an hour. You can come home from work and throw this in a pan, toss some garlic bread in next to it for the last few minutes and no extra dishes.

All you need to do is plan wisely;  when you are making spaghetti another night, make extra and freeze it, or if you are browning hamburger for another meal, double your batch and freeze half of it, then on LASAGNA night, add your favorite spaghetti sauce and viola!.

No need to cook those noodles either, just buy the oven ready pasta and you can assemble. The only time consuming part, if you consider 3-4 minutes time consuming, is mixing your ricotta cheese mixture.

Be sure to cover your baking dish with plastic wrap before you cover with the foil. Contrary to popular belief, the plastic wrap WILL NOT melt onto your LASAGNA, but will keep moisture in and prevent the cheese from sticking to the foil.

Let’s get started…..the kids are hungry and it’s a school night; let’s make LASAGNA!!


SUPER EASY LASAGNA:


Recipe for an 8 x 8 inch baking dish.

Preheat oven to 375

3-4 cups left over spaghetti ( meat and sauce )

9 – oven ready LASAGNA noodles

1- 16 ounce container Ricotta Cheese

1 large egg

1/2 tsp salt

1/2 tsp fresh ground black pepper

1 tsp Accent

6-8 ounces shredded mozzarella cheese


In a small bowl, combine Ricotta cheese, egg, salt, pepper and Accent and mix well. Adjust seasonings to taste if needed.

In an 8×8 inch baking dish, spread approximately 1 cup of spaghetti sauce and lay 3 oven ready LASAGNA noodles on top. Spread approximately 1 cup of spaghetti sauce, 1/3 of the Ricotta mixture and 1/3 of the shredded mozzarella cheese.

Repeat with two more layers, ending with the shredded mozzarella cheese.

Cover baking dish with plastic wrap and the cover with foil and bake 30-35 minutes. Remove foil and plastic wrap and cook an additional 5 minutes so the cheese browns on top and remove from oven and let stand 10-15 minutes before serving.

Serve with a fresh green salad and warm garlic bread.

Go Ahead… ”Just Try It! ”

Oct 04

GRANDPA’S 24 HOUR DILL PICKLES

Grandpa always had a huge garden with everything from Asparagus to Zucchini. He always had more than enough pickles and I loved going into that garden and picking those tiny little cucumbers with the prickly outsides and just brushing off the dirt and eating them right there in the hot sun.

Whether it was at grandma’s and grandpa’s or at home there was always plate of sliced cukes sitting on the counter, although they didn’t sit there too long. Every time somebody went into the kitchen, you’d grab one, sprinkle a little salt on it and keep going to where ever you were headed.

We would have them in salad, creamed with dill ( one of my favorites with pork chops ), thinly sliced in an oil and vinegar dressing with onions and dill, and of course GRANDPA’S 24 HR DILL PICKLES. There was always, always a jar on the counter curing and at least one or two in the fridge ready to eat.

These pickles are so easy to make and you can add anything to the brine you want, put in some onion and garlic, add some chili peppers, or even use the brine to pickle carrots, beans, asparagus or cauliflower.

Remember that once you cure them for 24 hours, you need to refrigerate them to keep them crisp.

GRANDPA’S 24 HR DILL PICKLES

Cucumbers, enough sliced to fill jar

Fresh Dill heads, enough to pack into jar

Onion, garlic or chili peppers ( optional )

Brine for a 2 quart jar:

1 cup vinegar

1/4 cup salt

1/4 cup sugar

Warm water to fill jar.

Place 1-2 dill heads in bottom of jar.

Slice cucumbers and pack into jar. Add onions, garlic and/or peppers if using.

Pack in additional dill heads.

In another container, mix salt, sugar and vinegar until dissolved. Make sure it is dissolved well.

Pour into jar with cucumbers and fill with warm water.

Cover tightly and shake well.

Turn jar upside down and let start to cure. Every once in a while give the jar a shake and turn. After the 24 hour cure, place in fridge and enjoy.

Go Ahead… “Just Try It!”

Sep 30

CREAMY CHIPPED BEEF (SOS)

It’s Throwback Thursday time, how many of you remember SOS? If your dad was in any branch of service, I’m sure you had this. Some had it with ground beef or sausage and some with dried, chipped beef.

Mom always made it with dried beef. You can still buy the jars of dried beef in the canned meat section of the grocery stores, but it is very salty. Mom found the better option is using the paper thin packaged beef by Buddig. It’s not as salty and of course it is moister.

This was and still is one of my favorites, when I want a warm fuzzy feeling on cold winters day, this is a quick go to and can be for breakfast, lunch or dinner. When we were kids it was for breakfast or an afterschool snack. Dad loved this anytime and if mom tossed a couple of sunny side up eggs on top of it, it was even better.

CREAMY CHIPPED BEEF (SOS)

2-3 6 oz pkg Buddig sliced beef or corned beef

1 stick butter

1/2 c flour

1 1/2 c half and half

2 tbl horseradish mustard

salt and fresh ground black pepper to taste

1 tsp Accent

Toast, English muffins or biscuits

Cut beef into strips and then cut the strips in half ( so they are not so long ), set aside.

Melt butter over medium heat, be careful not to let it get brown. Once melted, add 1/4 cup of flour and stir well, add the rest of the flour a little at a time until you have a nice thick roux.

Slowly add the half and half, stirring until the desired consistency. Add the beef, mustard, Accent and salt and pepper to taste.

Take care to not boil so it does not curdle.

Serve over buttered toast, English muffins or biscuits.

If desired, top with eggs cooked any style.

Go Ahead… “Just Try It!”

» Newer posts